How to Add, Remove, Enable, and Disable Add-ins in Outlook (Step-by-Step Guide)
Most companies use Microsoft Outlook as nothing more than email and a calendar — and stop there. Yet Outlook is the one tool that stays open all day for sales managers, support teams, finance specialists, and executives. The real question isn’t whether you use Outlook, but whether Outlook works for your business.
Outlook add-ins allow you to embed key workflows directly into the inbox — from customer management and document handling to internal approvals and routine automation. Add-ins come in two types: standard ones available in the Microsoft Store, and custom add-ins built specifically for your business processes.
In this article, you’ll learn how to add add-ins in Outlook, how to enable, disable, remove, and manage them — and why the right add-in strategy can directly impact team productivity and decision-making speed.
What Are Add-ins in Outlook?
An Outlook add-in extends the default capabilities of Outlook by adding extra functionality directly to the email and calendar interface. It can appear as a button, panel, or action and allows users to work with data without constantly switching between different tools. In practical terms, add-ins help turn Outlook from a basic email client application into a centralized workspace for everyday business tasks.
Teams use Outlook add-ins to make everyday work easier. These tools let employees handle tasks inside their inbox — from turning emails into action items to viewing customer data and approving documents — all in one place.
Add-ins can be either ready-made solutions from the Microsoft Store or custom tools developed for internal company processes.
How to Add Add-ins in Outlook
You can install Outlook add-ins in just a few simple steps. The guide below covers both the desktop app and the web version of Outlook.
Outlook Desktop App (Windows and macOS)
Open the Outlook desktop app and switch to your main mailbox. Then go to the Home tab and select Get Add-ins. This opens the Microsoft Store, where all available Outlook add-ins are listed.
You can either use the search bar or browse through the categories to find the add-in you need. Once you’ve made your choice, click Add and approve the requested permissions. As soon as the permissions are confirmed, the add-in becomes available in Outlook.
These steps are the same on both Windows and macOS, as the menu names and layout do not differ between platforms.

Get Add-ins button in Outlook Desktop

Access to the Office Store via All Apps
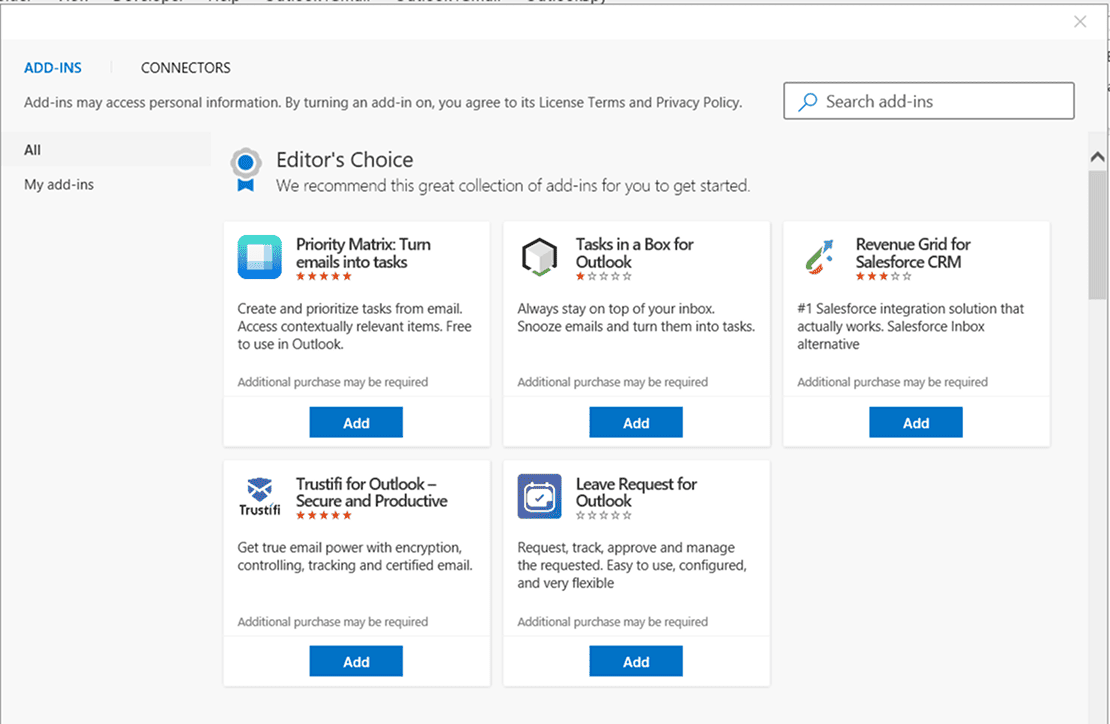
Outlook Add-ins Store with available add-ins
Custom Outlook Add-ins (Desktop App)
In addition to add-ins from the Microsoft Store, Outlook also allows you to install custom add-ins built specifically for internal business needs. These add-ins are usually developed in-house or provided by a third-party vendor and distributed as a file or via a direct URL.
To add a custom add-in, open the Outlook desktop app and go to the Home tab. Click Get Add-ins to open the add-ins management window, then switch to the My add-ins section. Scroll down to Custom Addins and select Add a custom add-in.
From here, you can choose to install the add-in from a URL or from a file, depending on how it was provided. After confirming the source and required permissions, the custom add-in becomes available in Outlook just like a standard one.

My add-ins section for adding custom add-ins
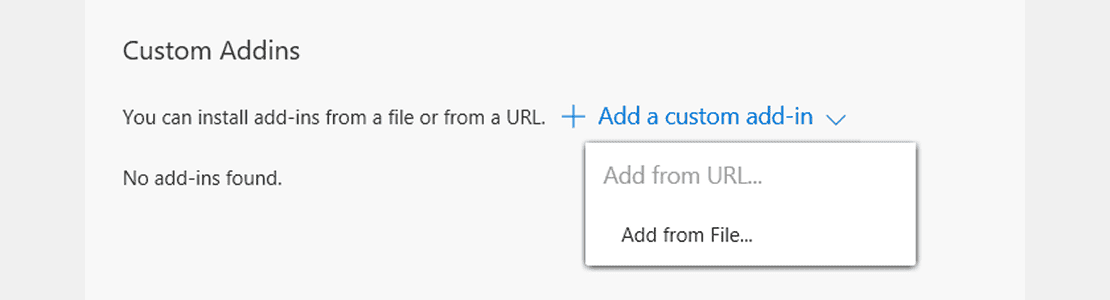
Installing a custom add-in from a file or URL
Outlook on the Web
If you’re using Outlook in a browser, sign in to your account first. Then click the Settings icon in the top-right corner and open View all Outlook settings.
From the settings menu, go to Mail, select Customize actions, and open the Add-ins section. Click Get add-ins to access the Microsoft Store. Choose the add-in you want and click Add to install it.
Once the permissions are approved, the add-in is immediately available in your Outlook account.
Note: The Outlook on the web interface may look slightly different depending on your region, organization settings, or Microsoft 365 subscription.
How to Remove Outlook Add-ins
If an add-in is no longer needed, causes issues, or interferes with normal work, a natural question is how to remove it. It’s important to understand the difference between disabling and removing an add-in. Disabling simply turns it off temporarily, while removing deletes it from Outlook entirely.
Removing Add-ins in the Outlook Desktop App
To manage add-ins in the desktop version of Outlook, start by opening the app and going to the Home tab. From there, select Get Add-ins to open the add-ins management window.
In the add-ins store, switch to the My add-ins section, where all installed add-ins are listed. Find the add-in you want to remove, open its options if needed, and choose Remove. After you confirm the action, the add-in is deleted from Outlook.
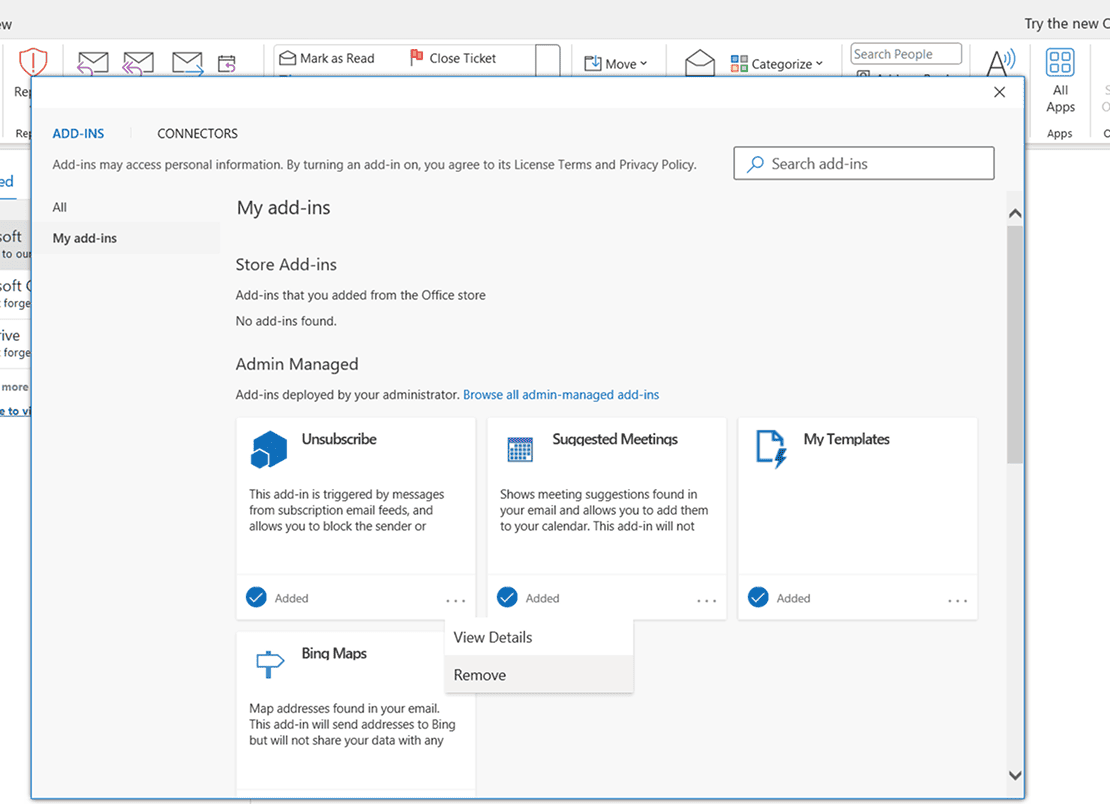
Viewing and removing add-ins in Outlook
If you’re unsure whether a specific add-in is responsible for a problem, it’s often a good idea to disable it first. This allows you to check its impact without removing it permanently.
Removing Add-ins in Outlook on the Web
In the web version of Outlook, begin by opening Outlook in your browser and clicking the Settings icon in the top-right corner. From there, select View all Outlook settings to access the full settings menu.
Next, open the Mail section, go to Customize actions, and select Add-ins. This page shows all add-ins currently installed in your account. Locate the add-in you want to remove and click Remove to delete it.
While the exact layout of Outlook on the web may vary depending on your Microsoft 365 subscription or organization settings, the overall process remains the same: open settings, access the add-ins section, and remove the selected add-in.
How to Enable and Disable Add-ins in Outlook
Managing add-ins isn’t only about installing or removing them. In many cases, you may need to temporarily turn an add-in off — or bring it back later. This is especially useful when troubleshooting or testing how Outlook behaves without certain extensions.
Disabling Add-ins in Outlook
Disabling an add-in can help if Outlook starts running slower, behaves unexpectedly, or if you suspect that a specific add-in is causing problems. Unlike removing an add-in, disabling it is temporary and doesn’t delete it from your account.
In the Outlook desktop app, open File and go to Options, then select Add-ins. At the bottom of the window, choose COM Add-ins from the dropdown menu and click Go. You’ll see a list of installed add-ins. Clear the checkbox next to the add-in you want to disable and confirm your choice by clicking OK. In some cases, restarting Outlook is required for the change to take effect.
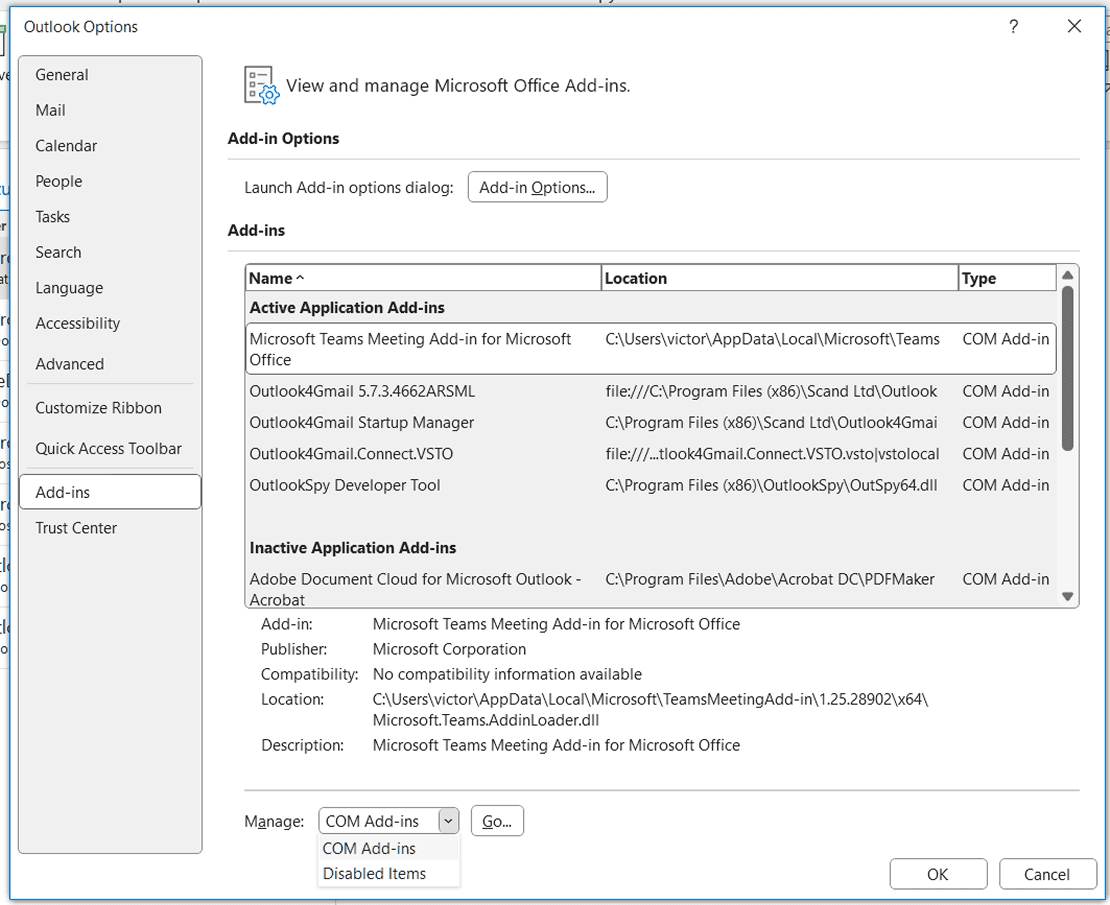
Enabling and disabling COM add-ins in Outlook settings
Once disabled, the add-in stops running and no longer appears in the Outlook interface.
Enabling Disabled Add-ins
If you’ve previously disabled an add-in and want to use it again, you can re-enable it through the same settings. Open File, go to Options, and select Add-ins. From there, open COM Add-ins, click Go, and check the box next to the add-in you want to turn back on. After confirming the change, restart Outlook if prompted.
Common Issues to Keep in Mind
Sometimes, an add-in may not appear immediately after being enabled. In most cases, this is resolved by restarting Outlook. In other situations, Outlook may disable add-ins automatically due to performance concerns or security policies.
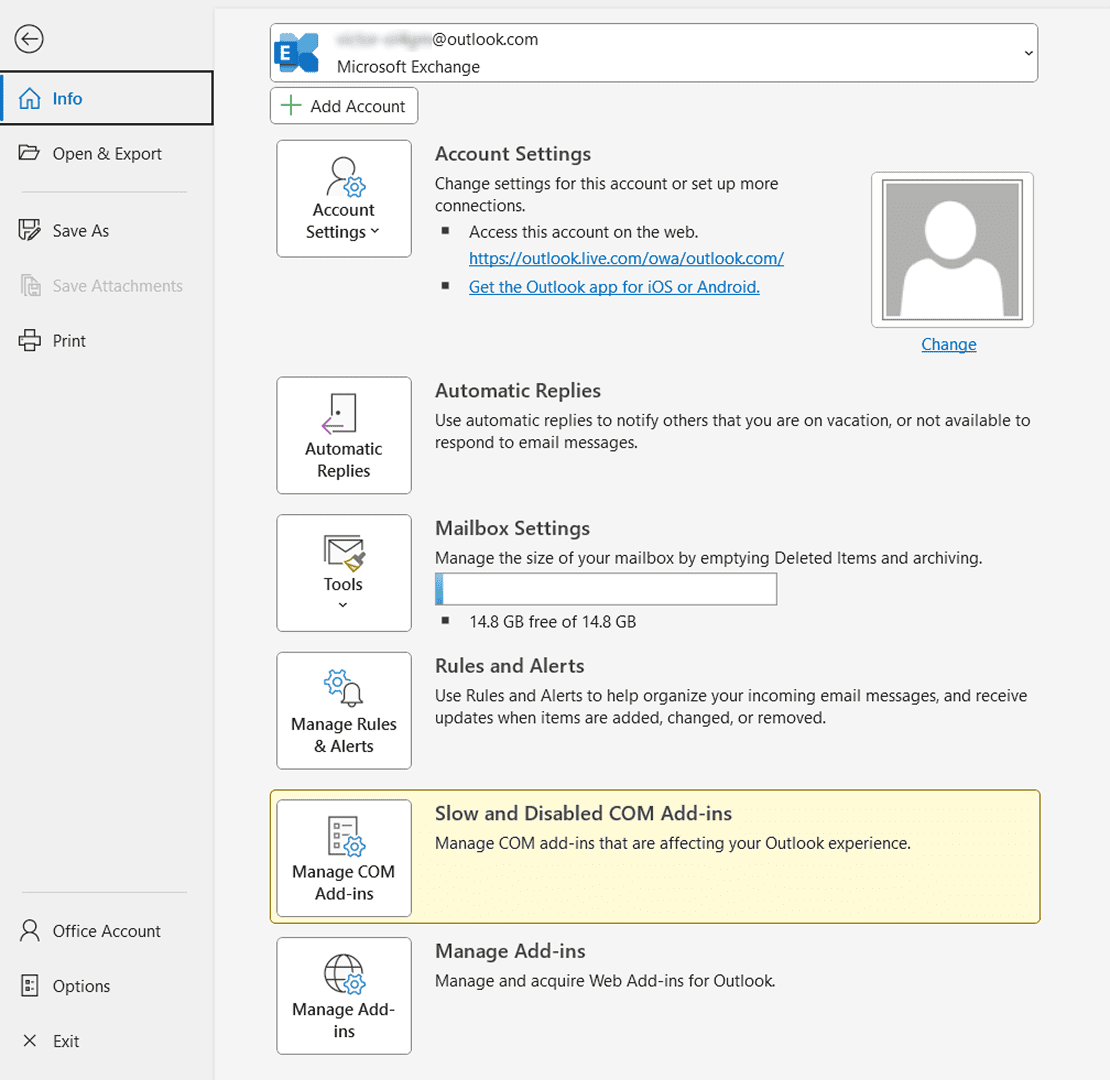
Slow and Disabled COM Add-ins section in Outlook
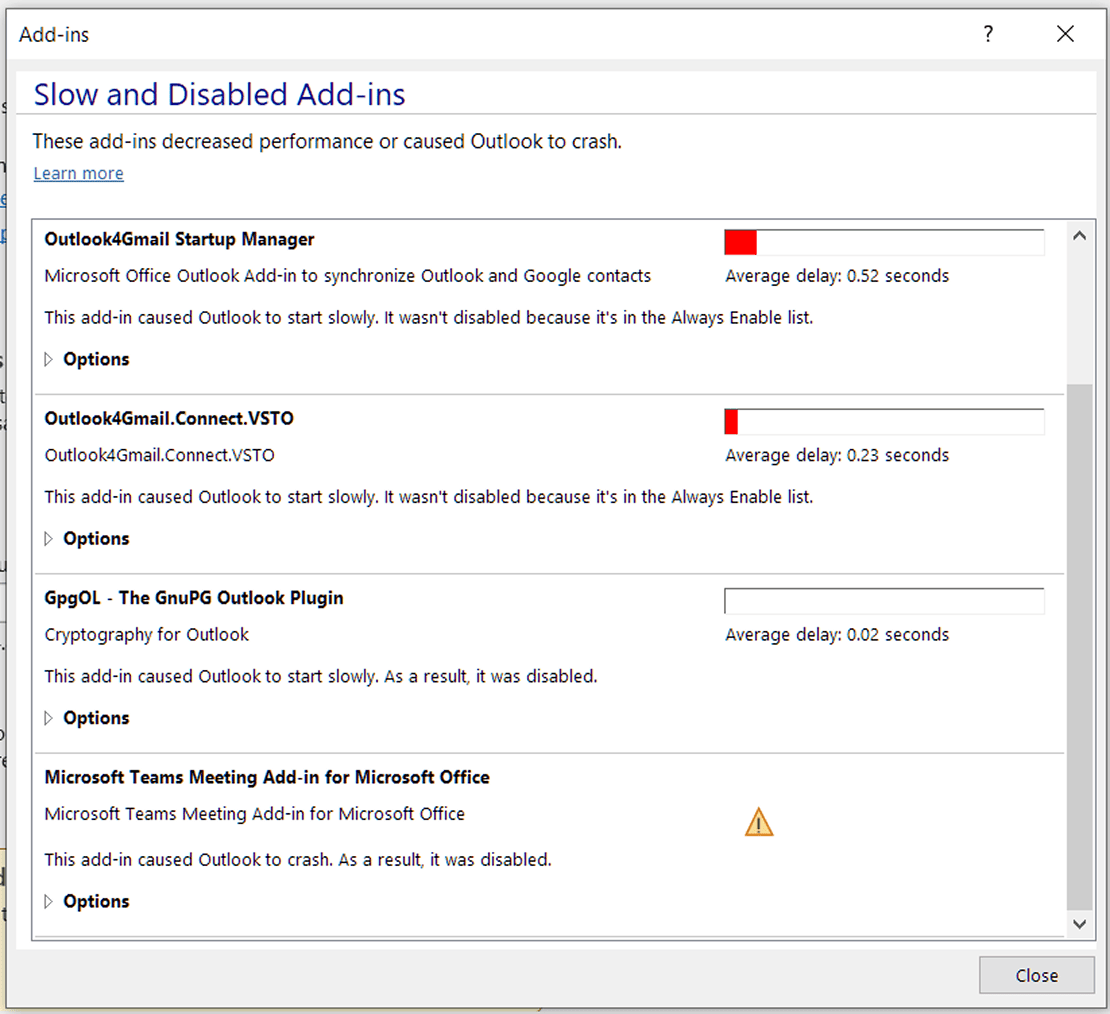
Add-ins that slow down Outlook or cause issues
In corporate environments, IT restrictions can also prevent certain add-ins from running. If an add-in keeps disabling itself or won’t stay enabled, it’s a good idea to review Outlook’s security settings or contact your IT administrator for assistance.
Managing Add-ins in Outlook (Best Practices)
For businesses, installing add-ins is just the starting point. What really matters is how those add-ins are handled over time. Every add-in changes how Outlook behaves, even if the effect isn’t noticeable right away.
Add-ins have a direct impact on performance. When too many are active, Outlook may start more slowly, emails can take longer to open, and stability issues appear more often. This is especially true for the Outlook desktop app, where outdated or poorly built add-ins can cause problems.
It’s worth checking the list of add-ins on a regular basis. Some tools stop being used, overlap with other systems, or simply no longer match the way teams work. When add-ins are installed and forgotten, they tend to add clutter instead of value.
At some point, standard Outlook add-ins are no longer sufficient. As companies grow, they often need closer integration with internal systems, workflows tailored to their processes, or stricter security rules tied to user roles. Ready-made add-ins from the Microsoft Store rarely meet these needs. That’s when organizations start building custom Outlook add-ins around their own operations.
At this stage, custom Outlook add-in development becomes part of a long-term digital strategy rather than a quick technical fix — especially when working with an experienced Outlook Add-in Development Company.
Common Issues with Outlook Add-ins and How to Fix Them
Even reliable add-ins can sometimes cause issues. Below are the most common problems users face, explained in a clear Problem → Cause → Solution format.
Add-ins Not Showing in Outlook
Problem: The add-in is installed, but it doesn’t appear in Outlook.
Cause: The add-in may be disabled, hidden from the ribbon, or not supported in the current Outlook version (desktop vs. web).
Solution:
- Go to File → Options → Add-ins and check whether the add-in is disabled
- Make sure the add-in supports the version you’re using (Outlook desktop app or Outlook on the web)
- Restart Outlook to apply changes
Add-ins Disabled Automatically
Problem: Outlook turns off an add-in without warning.
Cause: Outlook may disable add-ins it considers slow, unstable, or risky for performance and security.
Solution:
- Open File → Options → Add-ins and review Disabled Items
- Re-enable the add-in if allowed
- If it keeps happening, consider removing the add-in or checking with IT
Add-ins Not Working After an Update
Problem: An add-in stops working after an Outlook or Microsoft 365 update.
Cause: The add-in may not be compatible with the latest version, or required permissions may have changed.
Solution:
- Restart Outlook and check for add-in updates
- Reinstall the add-in if necessary
- For custom add-ins, confirm they support the updated Outlook version
Frequently Asked Questions (FAQs)
Why can’t I add add-ins in Outlook?
If the Get Add-ins option is unavailable or grayed out, it’s usually related to your account or organization settings. In many corporate environments, system administrators disable the installation of third-party add-ins for security and compliance reasons. This can also occur if you’re using an older version of Outlook, a Microsoft 365 plan that doesn’t support add-ins, or if you’re signed in with a personal account instead of a work or school account.
What’s the difference between disabling and removing add-ins?
Disabling an add-in simply turns it off. The add-in stays installed and can be enabled again at any time. Removing an add-in deletes it from Outlook completely, meaning you’ll need to reinstall it if you want to use it again. When troubleshooting, disabling is usually the better first step.
Do Outlook add-ins affect performance?
They can. Some add-ins use additional system resources, especially if several are running at once or if an add-in isn’t well optimized. Performance issues are more noticeable on older devices or in large mailboxes. If Outlook starts slowing down, disabling add-ins one by one can help identify the cause.
Are Outlook add-ins safe?
Add-ins available through the Microsoft Store go through a review process, which helps reduce security risks. That said, add-ins still request permissions, so it’s important to review what access they require before installing them. In managed work environments, security policies often determine which add-ins are allowed.
Can I use the same add-ins in Outlook desktop and web?
Many add-ins work in both the desktop app and the web version of Outlook, as they’re tied to your Microsoft account rather than a specific device. However, some add-ins are designed specifically for desktop use or have limited functionality in a browser.
Can businesses build custom Outlook add-ins?
Yes. Businesses can develop custom Outlook add-ins tailored to their workflows. These solutions are often part of broader desktop custom software development or mobile app development initiatives, especially when Outlook needs to integrate with internal systems, automate routine tasks, or improve email handling. Custom add-ins can be deployed internally or managed through Microsoft’s add-in administration tools.