How to Submit Your App to the App Store and Avoid Common Rejection Reasons
Publishing an app to the App Store is not just the final stage of development, but a separate process that requires careful preparation and understanding of Apple’s requirements.
Successful publication allows you to get your app to market faster and avoid delays due to moderation rejections.
To be successfully approved, your app must demonstrate stability, transparency, compliance with Apple’s guidelines, and real value for the user. Apps that provide minimal functionality, simply wrap websites, or offer no meaningful user experience are typically rejected.
In this article, we’ll look at key aspects of app preparation, common mistakes, and recommendations that will help your app successfully pass the App Store review.
Step-by-Step: How to Submit Your App to the App Store
Publishing an app to the App Store is a clear and regulated process that includes several steps: from preparing the project to submitting it for moderation. Below is a step-by-step guide.
Join the Apple Developer Program
The first step is to sign up for the Apple Developer Program. Without an active subscription ( $99/year), access to publishing features is not possible. Once registered, the developer has access to the App Store Connect, the main app dashboard where new projects are created.
Access the App Store Connect and Create a New App
Project creation starts with adding a new application in the My Apps section. Here you specify the name of the application, the main language, and a unique Bundle ID, which is registered in advance in the Certificates, Identifiers & Profiles section of the developer account, and also create an internal SKU — any unique identifier for your own accounting needs. If a team is working on the project, at this stage you set access rights for other participants.
Configure Certificates and Provisioning Profiles
Next, you need to configure certificates and signing profiles, without which publishing is not possible. In the Certificates, Identifiers & Profiles panel, you create signing certificates, most often the Apple Distribution Certificate, as well as application IDs (App IDs) and provisioning profiles that link these elements together. For most projects, it is most convenient to use automatic signing through Xcode by selecting Automatic Signing, which avoids a lot of manual configuration.
Prepare the Project in Xcode
When building a project in Xcode, it is important to use the latest version of the development environment and supported versions of the SDK. During the preparation process, make sure that all mandatory elements — such as icons of different sizes, and LaunchScreen — are added correctly.
Pay attention to the Info.plist file: here you will find explanations for all the permissions requested by the application. For example, access to the camera, geolocation, or contacts must be accompanied by a text explanation of the reasons for the request, so that the user understands why the application needs this data.
Justification of Access to Device Functions and User Data
The most important part of preparation concerns the transparency of handling personal data. If an application requests access to device functions such as camera, microphone, geolocation, contacts, or photo album — all these requests must be justified in advance in Info.plist.
Implement App Tracking Transparency
If an application collects user data for analytics, advertising, or profiling purposes, you must implement App Tracking Transparency and obtain explicit user agreement before tracking in accordance with Apple’s requirements.
Archive and Upload the Build
After checking all the settings, the project archive is created — for this purpose in Xcode select the menu item: Product → Archive.
Next, the publishing wizard is used: via Distribute App → the App Store Connect → Upload the build is uploaded to the App Store Connect.
If the process is successful, the build becomes available in the TestFlight section and is ready for further authoring.
Metadata Filling
Once the build has been uploaded, the second key step begins — completing the app card in the App Store Connect. First, the application version is specified, and the uploaded build is linked. Next, you need to carefully fill in all text fields that will be displayed in the App Store for users.

Filling in Text Fields (title, sub-title, app description, keywords)
The title of the application should clearly reflect the essence of the product. The subtitle helps summarize the main purpose of the application.
The description section details the app’s functionality, benefits, key features, and use cases, with up to 4,000 characters allowed.
Keywords are of particular importance — they are specified in commas and help improve the app’s visibility in App Store searches, so it is worth selecting them with the target audience and the most relevant search queries.
Contacts and Copyrights
The contact section includes a support URL that allows users to request help and, if necessary, a marketing URL for promotion. In addition, copyright information is entered — usually the name of the company or the name of the developer.
Privacy Policy Posting and Filling Out the App Privacy Form
The privacy block deserves special attention. It is mandatory to place the privacy policy on a separate page of the site, accessible via a direct link.
The policy should describe in detail what data is collected by the application, how it is processed, stored, and transferred to third parties and what are the rights of users in relation to their personal information.
After that, move on to filling out the App Privacy form in the App Store Connect. Here you need to specify the types of data collected, the purpose of data collection (e.g. analytics, advertising, functional purposes), and the fact of tracking usage or lack thereof.
You should be especially attentive to this item if the application uses third-party analytics or advertising SDKs -— their data handling policy should be taken into account when filling out the application form.
Age Rating Questionnaire
The age rating questionnaire is then filled out. The developer asks questions about the presence or absence of certain types of content in the app — violent scenes, gambling, sexual or medical content, references to alcohol, tobacco, etc.
Based on this data, the system automatically determines the age rating, which will be indicated on the app’s page in the store. Here is the gradation presented on the official website:
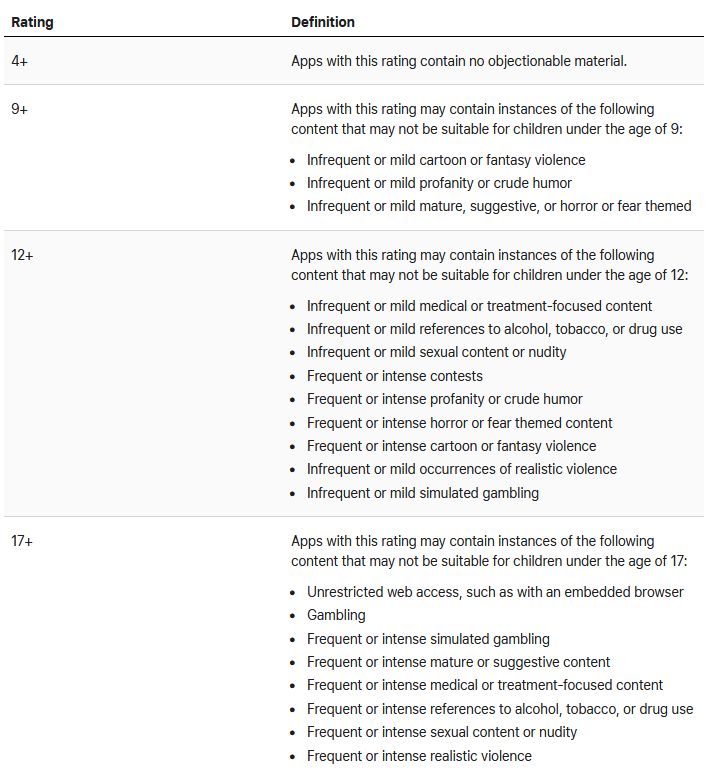
Age ratings, App Store Connect Help
Screenshot Preparation for Different Devices
For each type of device supported by the application, you need to prepare a separate set of screenshots. For example, for iPhone 6.9“, iPad 13”, Apple Watch, or Mac, you need to upload images demonstrating the actual application interface.
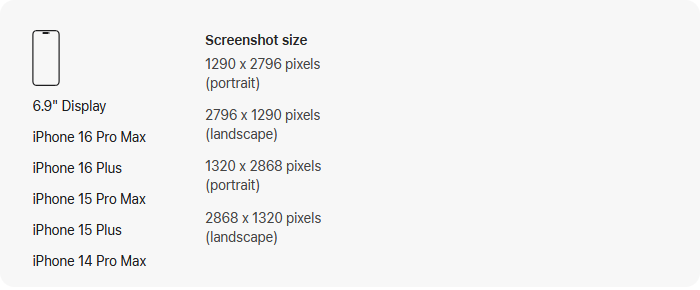
Screenshot sizes for iPhone 6.9-inch display
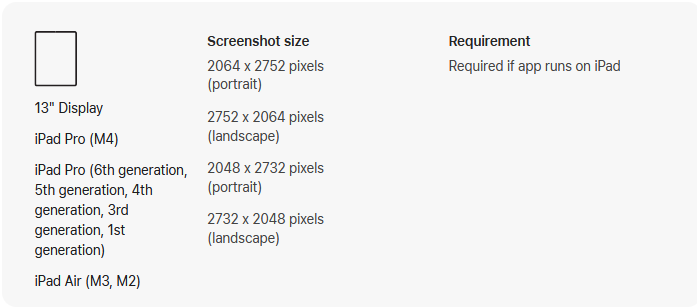
Screenshot sizes for iPad Pro 13-inch display
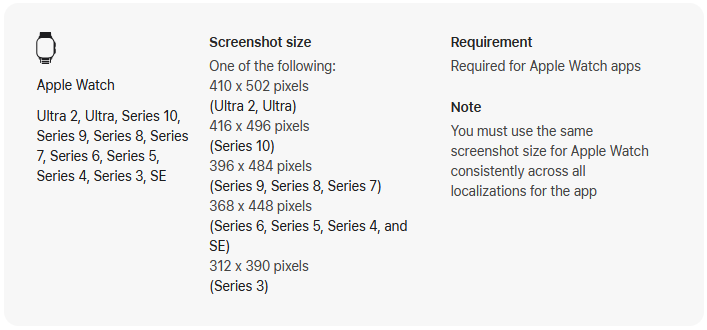
Screenshot sizes for Apple Watch
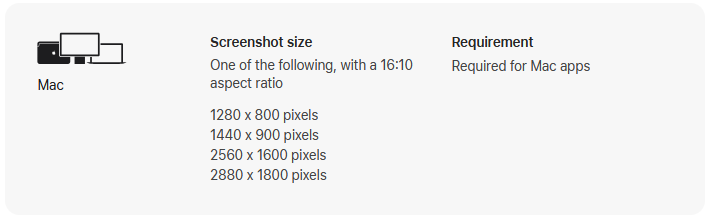
Screenshot sizes for Mac apps
The minimum number of screenshots uploaded is one screenshot per device category, maximum — is up to ten images.
Screenshots should demonstrate the main functions, not contain false promises, and reflect the functionality as truthfully as possible. Text descriptions on images are allowed, but please be aware of text size and readability limitations within Apple’s guidelines.
Final Check and Moderation Submission
Once all the preparation stages are passed — the build is uploaded, metadata is filled in, screenshots are posted, and privacy questionnaires are correct — the developer performs a final check of the entered data and presses the Submit for Review button.
After that, the app goes to the moderation queue, during which the App Store Review team analyzes not only the technical stability and security of the app but also the completeness of the submitted data, compliance of the design with Apple’s recommendations, reliability of the description and transparency of user information processing.
Most Common App Store Rejection Reasons
App Store Review rejects apps not only for technical errors but also for violations of legal, ethical, and user standards. Below is a complete list of the most common reasons for rejection based on the current App Store Review Guidelines.
UI/UX Inconsistencies
- Lack of intuitive and user-friendly navigation.
- Violation of Apple’s Human Interface Guidelines (HIG).
- Poor adaptation for different screen sizes and devices.
- Lack of support for accessibility features (VoiceOver, Dynamic Type, Switch Control, etc.).
- UI elements mislead the user or encourage incorrect interactions.
- Hidden functionality or undeclared features (cloaking).
- Unethical or offensive visual content.
Crashes & Bugs
- Crashes at startup or during function execution.
- Unpredictable behavior or bugs affecting functionality.
- Incomplete or incorrect application testing.
- Errors related to memory management, device resources, and background tasks.
Privacy Issues
- No privacy policy or unavailable link.
- Collection of personal data without explicit consent.
- Incorrectly filling out the App Privacy questionnaire.
- Lack of notice and consent when using App Tracking Transparency (ATT).
- Collecting location, contact, photo, and biometric data without justification.
- Using third-party SDKs and analytics without disclosing all aspects of data processing.
- Lack of ability to withdraw consent to data collection.
- Violations of privacy laws (GDPR, COPPA, HIPAA, China’s Personal Data Protection Law, etc.).
Incomplete or Misleading Information
- Lack of full description of app functions.
- Failure to reflect all in-app purchases.
- Incorrect or misleading marketing statements.
- Failure to match the description to the actual behavior of the app.
- Failure to disclose subscription terms and conditions (cost, duration, renewal terms).
- Lack of contact information for user support and moderation.
Intellectual Property Violations
- Use of content without licenses (video, music, images).
- Violation of copyrights, trademarks, brands, and logos.
- Unauthorized use of company names, characters, and celebrities.
- Violations of patents or trade secrets.
Legal Compliance
- Violations of local and international laws.
- Working with illegal content or services (gambling, drugs, weapons, tobacco products, etc.).
- Lack of the necessary license for certain activities (e.g., financial applications, medical services).
- Violation of sanctions regimes and trade restrictions.
- Violation of child protection laws (e.g. COPPA in the US).
Safety and Harmful Content
- Promoting violence, terrorism, and self-destructive behavior.
- Offensive, sexual, racist, discriminatory, or shocking content.
- Apps that promote fraud, deception, or manipulation of users.
Spam, Copycats & Low-Quality Apps
- Duplication of existing applications (copycats).
- Automatically generated applications with no unique value.
- Apps with a single webview function.
- Massive publishing of similar apps for different regions or purposes (template apps).
Payment Issues
- Bypass In-App Purchase mechanism for digital content.
- Lack of ability to manage subscriptions within the application.
- Incorrect disclosure of payment terms, trial periods, and renewals.
Developer Misconduct
- Fraudulent acts of publication.
- Attempts to manipulate ratings, reviews, or downloads.
- Using hidden functionality (e.g., hidden APIs).
- Providing false information when submitting an application.

How to Avoid Rejection and Speed Up Approval
Even a small error or omission can lead to app rejection, delayed release, and urgent revisions. Checklists help you make sure your app meets App Store requirements before submitting it for moderation. Below we have prepared three checklists to check key components of an app.
Technical Checklist Before Shipping:
- The project is successfully built in the latest stable version of Xcode.
- All permissions in Info.plist have descriptions (NSCameraUsageDescription, NSLocationWhenInUseUsageDescription, etc.).
- The App Tracking Transparency (ATT) mechanism is implemented and tested if user IDs are collected.
- The app works stably without crashes (tested on different devices and iOS versions).
- There are no unused APIs, hidden functions, or private APIs.
- Certificates, profiles, and Bundle IDs are correctly configured.
- Up-to-date build successfully uploaded to the App Store Connect.
Content Checklist:
- The title, subtitle, and description correspond to actual functionality.
- Up-to-date contact information for support is provided.
- The privacy policy is completed and up-to-date (available via direct link).
- The App Privacy questionnaire is honestly filled out.
- All In-App Purchases and subscriptions are described (cost, terms and conditions, auto-renewal).
- Prepared correct screenshots and video previews for all devices.
- Age rating questionnaire completed.
Legal Checklist:
- No violations of copyrights, licenses, or trademarks.
- All legal requirements for personal data (GDPR, COPPA, etc.) are met.
- No prohibited content (drugs, gambling, violence, discrimination, etc.).
Beta Test via TestFlight
TestFlight is Apple’s official platform for beta testing apps before they are published to the App Store. It allows you to securely distribute test builds to a limited number of users and identify problems with your app in advance.
A developer uploads the build via Xcode, after which it becomes available in App Store Connect to set up beta testing via TestFlight. Once approved, the build becomes available for testing. Both team members and external testers can participate in the program, which can be invited via a special link.
Using TestFlight allows you to see in advance how the application works on real devices with different iOS versions, different network parameters, and user scenarios.
Testers can quickly report bugs, glitches, or inconveniences in the interface, and developers can make edits before the final version is sent for moderation. This helps minimize the risk of rejection at the App Store Review stage, as most technical and user issues are fixed in advance.
TestFlight gives developers not only feedback from future users but also Apple’s first technical check, allowing them to identify possible violations of App Store requirements in advance.
A build in TestFlight can be tested for up to 90 days, and the maximum number of external testers is 25,000. This has made TestFlight a standard and recommended step in preparing almost any app for publication.
Recommendations for Testing:
- Engage a minimum of 5-10 external testers.
- Test the application for at least 1 week.
- Run key user scenarios: first launch, authorization, payments, network disconnection, background tasks, deep link clicks, etc.
- Include different devices and OS versions in testing (old iPhones, iPads, new models, different regional settings).
Conclusion
Even with careful preparation, redirects sometimes happen. It is important to read the moderators’ comments carefully — most often they directly indicate the reason for the rejection.
If some wording remains unclear, you can ask clarifying questions through the Resolution Center — Apple specialists explain comments in sufficient detail and suggest what needs to be corrected for successful publication.
To minimize the likelihood of such situations even before the app is submitted for review, we at SCAND offer audits of finished projects, helping to identify possible violations and prepare the build in advance, taking into account all App Store requirements, and using up-to-date technologies like Swift for modern iOS development.
Contact SCAND — we will help you create a high-quality app, successfully pass moderation the first time, and release your app in the App Store without unnecessary delays.